Monday, October 31, 2011

Meet Baby Swank

I wanted to tell you about one of my favorite Etsy shops...Baby Swank. Megan Visser is the creator of all the beautiful and useful products at Baby Swank. She recently started making herb infused organic baby bath wash, shampoo and oils. I recently ordered the baby wash/shampoo for my grand babe. I choose the lavender chamomile scent, as I know my DL loves lavender. After trying it, my DL said that is smells wonderful, and leaves babys skin soft, silky and feeling moisturized.

Megan says of her products, "I love items that are fun & fashionable as well as natural, good for you & the environment, & save you money in the long run. I strive to make products that fit into this mindset. "


Megan started her shop in 2010 selling her one-of-a-kind wash cloth bibs.  They are fashionable and functional, and since they snap on in the back, toddlers can't pull them off too easily!  She decided to offer them to the public after making them for her own sons and friends.  In that short time she has not only created a very nice Etsy shop, but has also been an awesome encouragement and help to moms who are learning to manage a business and raise a family.  You can read more about her and her shop at her blog Baby Swank.

Tuesday, October 25, 2011

Camping and Donuts

Camping; in the Midwest our thoughts don't turn to the idea until the leaves start to turn a little orange and yellow.   My family got the bug to take a short camping trip; just a short week end, invite friends, roast marshmallows.  We were having beautiful fall weather... until the week of the planned trip! Then the temperature suddenly dropped to the high 40's low 50's, but they were determined to go, so I reluctantly agreed.  The day of our trip was actually beautiful and sunny. We met our friends at a nearby campground, grilled burgers, roasted marshmallows and generally had a lovely time.  We have had a very dry late summer and early fall, so the big bon fire we envisioned to keep us warm after the sun went down could not happen.  It was ok, we had a tiny fire and huddled around it, betting who would light their shoes on fire first. Two of my sons made an amazing discovery that I will now share...
Pin It


Nearby our house is an apple cider mill. Ever since my kids were little, we have been buying their apple cider donuts. (not just in the fall either, we eat them all year!) My lovely DL and oldest son requested cider donuts for the camping trip (another aside, they were smart and went home to their bed for the night, as they live very nearby the camp site). Finally this leads me to my recipe... As the guys were sitting around the campfire waiting to be fed some dinner, they remembered the donuts were in the car. I had also brought a bag of caramels to munch on. They decided to heat up their donuts over the fire, and upon finding the caramels they hit on the idea of roasted caramel cider donuts! Here is the very simple recipe...

*Put a caramel on your roasting stick, heat it up till it starts to get warm and pliable.

*Remove caramel from stick and try not to eat it while you stick your donut on the stick. (you don't have to have a cider donut, but the cake kind probably works best).

*Now fill up the donut hole with the softened caramel.

*Roast the whole thing till warm and slightly browned.

*Devour immediately!


The evening ended blissfully until we went to bed and discovered that this particular campground was infested with skunks!....but that is another story!

Monday, October 24, 2011

Meet Sunshine and Ravioli.......Etsy Shop Monday

SUNSHINE AND RAVIOLI is an Etsy shop featuring fun and whimsical paper goods for any special occasion you might have, or just to pamper yourself with something beautiful.  The shop is run by Stephanie and as she says her name comes from, "my favorite line from Louis Prima's version of "Pennies from Heaven". It's a fun, optimistic song and that's what I hope to offer you- fun, whimsical pieces of paper sunshine (but you'll have to get your own ravioli- sorry!)."

I recently ordered these book plates from her shop. They arrived in a sweet little glasine envelope and I love them because they have character and just the right touch of vintage feel to them.  I look forward to using them on my most special books.


You can find Sunshine and Ravioli at www.sunshineandravioli.Etsy.com
Stephanie is a self-taught folk artist, who says she doesn't remember a time when she didn't like to draw, color, paint, or just make things. Most all of her paper goods are made from high quality inks on acid free paper.
Creating her beautiful paper products from home allows her to be there when her kids get home from school.


 Please check out her blog and Facebook links:
newsletter, for special offers:
http://eepurl.com/eYZD

Facebook page:
http://www.facebook.com/SunshineandRavioli

Sunshine and Ravioli blog:
http://sunshinenravioli.blogspot.com

Friday, October 21, 2011

DIY Vintage Owl Pennant Banner


I was inspired to make this fun little project for a friend, her baby shower was to be at our house, and I knew she liked these and had her eye on them on Etsy; so I got out my fabric stash in the browns, yellows and oranges that I thought would fit her theme and got to work.

The fabrics I chose
To make banner shown, you will need:
*16-7 1/2" 9" x 9" triangles in coordinating fabrics of your choice
*1- 2 1/2" by length of your banner strip of fabric (I used 5'3")
*1/4 yard heat and bond Ultrahold Iron-On adhesive
*Fabric scraps for applique
*Coordinating thread
*2 yds - cotton bias tape or ribbon for ties (optional)


First I cut out all the triangle pennant flags. The short top side is 7 1/2", each long side is 9".  I used eight flags in this banner, but you can make yours as long or short as you like. I made a paper pattern and also used my ruler and rolling mat cutter.
cutting out triangles
I doubled the fabric for a couple reasons. We live in Kansas where it's windy! If you ever use these outside, they hang better with a little more substance to them, not thrown about by the wind so easily.  Also, since I had decided to put the baby's name on the banner, I though if I doubled it, then if she wanted to use it for something else, it could be flipped around and, ta da...plain banner on the other side.

I also cut out the fabric strip that I used to attach all the flags. It is 2 1/2" wide by approximately 5'3" long. I used two strips and sewed them together. The length you choose depends entirely on how many flags, and how far apart you want them spaced. I spaced mine about 1" apart. Also at each end of the banner I attached about a 1 yd. piece of cotton bias tape for an extra tie.

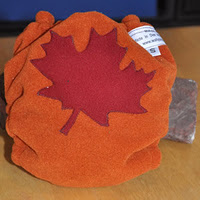
owls from conception to completion
Next I had to decide what to applique. My friend likes owls, so I put an owl on each end of the banner. I googled owl appliques, and sketched a few on paper that I liked.
I chose the little round guy you see in the pictures. To make him you will need 4 different fabrics. Body, Belly, Beak and Eyes. I will tell you right now, I am not an applique expert, and I totally used the heat and bond NOT according to directions. I cut out my pattern, cut each piece out of fabric, and then lightly tacked the fabric to the heat and bond. Then I cut out each piece of the applique and ironed them down a little better to the heat and bond. Then peeled off the backing paper and placed all the elements of my design down on the ironing board. When everything was in place on the flag, I ironed them all together. My owls were done, now on to the letters...
sewing down the letters


I free hand cut SURI out of scrap fabric. I cut it double, because I didn't want to bond it down, and I thought it would sew down better being doubled. You could also heat and bond the individual letters down, which would make it easier. After I had all the letters in place, I used my walking free style foot to top stitch the designs in. On the owl I made eyes, and outlined everything with my own style. On the letters, I just sewed back and forth to make several random lines to make them subtly stand out from the back ground.
Sewing the two flag pieces together

OK, now my applique owl and my letters are all sewn.  I quick iron over them to flatten them out and I backed each flag with a coordinating fabric.  I sewed down the two long sides of each triangle, no need to sew across the top, as that will be sewn with the fabric strip when assembling.  When all the flags were sewn together, I then layed them out in the order I wanted.  I left a blank flag between owls and letters.  Then I pinned the right side of the strip to the right sides of the flags, spacing evenly. 
pinning flags to fabric strip
I used a 1/4" seam and sewed down the strip.  Almost done....then I ironed the fabric strip up, folded it in half and ironed again.  the back side was the salvage edge, so I didn't fold it under, but if you had a raw edge you could fold it under if you wanted to.  After that was all in place I top stitched, making sure to include the back fabric in as I sewed.  On the ends I added a piece of cotton bias tape, so I tucked that under and sewed it down as I top stitched. 
Sandwiched bias tape into folded end of banner


One more pass with the iron, and I was finished!  Let me know if you try one, and what design you use!

Thursday, October 20, 2011

Check the Etsy Cloth Diaper Blog for the latest Giveaway

Click over to our cloth diaper blog to enter the latest giveaway.  Giveaways will be taking place every Wednesday!  Check back often.  Follow my blog for latest updates....
http://etsyclothdiapers.blogspot.com/2011/10/review-and-giveaway-of-boulevard.html

Pin It

Wednesday, October 19, 2011

Pumpkin Bars...Our All Time Fall Favorite

One of my all time favorite fall recipes is for Pumpkin bars.  I copied this recipe several (too many to count) years ago from my friend Sherry.  I have made it over and over again for pot lucks, company and just for us.
I hope you enjoy trying this easy and quick bar recipe.

PUMPKIN BARS


Ingredients:

Bars:
4 eggs
1 2/3 C. sugar
1 C. oil
1 - 16 oz. can of pumpkin
2 C. flour
2 tsp. baking powder
2 tsp. cinnamon
1 tsp. salt
1 tsp. baking soda

You will bake this in an un-greased jelly roll pan.  Heat oven to 350o
Beat together the 4 eggs, sugar, oil and pumpkin.  Add the flour, baking powder, cinnamon, salt and soda.
Mix well and spread evenly in jelly roll pan.  Bake at 350 for 25-30 minutes until springs back slightly.

Cool on rack frost with recipe below when cool.  Cut into bars and top with candy pumpkin, candy corn, or fall decorations!

Frosting:
3 oz cream cheese ( I usually use more)
1/2 C. butter softened
2 C. powdered sugar
1 tsp vanilla

Mix all ingredients together well and spread of top of bars. Cut into 2x3" rectangles, or what ever size bars you like.

Pin It


Monday, October 17, 2011

Meet Winkydinks....Etsy Shop Monday

 
I had the fun of interviewing Jen from Winkydinks for the Etsy Cloth Diaper Blog, I have reposted my interview here for the first installment of my Etsy Shop Mondays!

Winkydinks has been making fleece and wool covers for sale on Etsy since November 2008.   Using breathable covers is great for baby's skin and also helps regulate diaper temperature. Both fleece and wool work to repel the moisture back into the diaper, and protect the outer clothing. You might notice "compression wicking" if a child is sitting or laying for a long period of time with a full diaper - this is because they are not completely waterproof like PUL; but the benefit is the breath-ability and softness!


Winkydinks goal is to make things for the people who need them. Commitment to online customers keeps her shop busy. "I don't want people to have to wait weeks to get their fluffy mail, so I only offer custom slots when I know I'll have the time to get them done in a week or so. Last year I had to scale back production quite a bit and re-balance my life. I had gotten a little too caught up in Winkydinks and forgotten that I wanted to do it for fun. "

The passion behind Winkydinks is the excitement From knowing that their products are being used by people everywhere (including Malaysia, Australia, and Sweden!). Inspiration comes from browsing the fabric store and searching for great deals on old sweaters at the thrift shop.  Winkydinks never makes the same wool item twice, when you purchase a re-purposed wool soaker or longie, you are getting a one of a kind creation. Lately, Winkydinks does some custom orders with appliques. "They take more time and effort, but I get a lot of satisfaction knowing that someone is getting exactly what they want, and I like the challenge of doing something new every once in awhile." Click here to see some photos of new designs.


If you are interested in trying wool or fleece for it's breath-ability and softness on your babies skin, take a look at the options in Winkydinks Etsy shop.

Saturday, October 15, 2011

DIY Fabric Leaves


I recently had to make 50 or 60 of these for a wedding we designed.  I thought it would be fun to post some photos and how to's of the project, as these leaves can be a really neat accent decoration around the house, for a party or, as we used them, for a wedding.

I used three to four layers of coordinating fabric per leaf.  The first thing I did is cut them all out!  I drew a simple leaf shape pattern and cut multiple layers of the same fabric, that way they weren't all perfect.

After cutting the leaves out, I used brown thread and my free style quilting foot on my machine.  I think you could get the same effect if you disabled your feed dog and used a regular sewing foot, but I haven't tried this.
I just free style sewed leaf veins up and around each leaf.

I chain sewed them to save time, but when I finished them all I thought that would also make a fun garland, all the leaves strung together.

Sewn leaves draped as a garland before cutting.


close up of the sewn leaves


After sewing the leaf veins in all the leaves I cut them apart!


After cutting them apart, I took some small gauge floral wire and cut it into about 8" long pieces.  I inserted wire in the bottom end of each leaf and folded it over and twisted it together.  After twisting the wire loosely together I wrapped each wire in brown floral tape.  You could obviously use green depending on where you were using the leaves and what color scheme you had in mind.


That is pretty much it.  We wrapped the wire stems around tree branches
to give the feel of a few fall leaves remaining on the trees.  I also used them for all the boutineer and corsage bases.  With the red flowers they were very striking.


Pin It

Tuesday, October 4, 2011

This was originally posted on the Etsy Cloth Diaper blog...

Meet the Etsy Cloth Diaper Team: Kelly from Lil' Stuff

This week we'll meet Kelly, from Lil' Stuff. Kelly has been selling on Etsy for about one year. Kelly first started out knitting baby items as gifts. People suggested she sell her creations and once her daughter-in-law got into cloth diapering, she switched to offering those items. Her store: www.kellylulu.Etsy.com offers a wide variety of cloth diapering items including wet bags, diaper pail liners, cloth wipes and swim dipes. Kelly sews out of her home and enjoys a sunny view of the birds as she works.


Kelly has hung inspiration bulletin boards around her workspace to help inspire her and provide motivation while she works. Her major inspiration, though, is her granddaughter, Fable Rose.


Kelly cloth diapered her own children for economical reasons, because it is better for babies' skin and because it is less wasteful. Kelly shares this piece of advice for cloth diaper users: always do a cold water rinse before your wash cycle, as it allows the stains to rinse out before setting in the hot water.


Kelly recently designed a new wet bag that she calls her gramma go bag. It combines wipes, wet bag, and a pocket for your wallet, etc all into one bag with a strap! She has designed all of her own bags.

This past summer, Kelly introduced a new cloth diaper swim suit. Using her granddaughter as a model, Kelly designed a swim suit with a cloth diaper bottom and matching top. "I was rather pleased with my final design, and will make them again next summer," said Kelly.

"I just would like to say that it is a blast selling on Etsy, and also at the few craft fairs I have done. I love talking to young moms with a passion for cloth diapering and natural child rearing etc, I was really surprised at how many moms actually stopped and talked and made a purchase at our booth the last fair we did...and as I have said before, I am amazed at all the moms who sew on Etsy, you deserve a special award, I could have never done that amount of sewing when I had kids at home, let alone kids still in diapers..."